Back in April I went camping in Central New South Wales. On the way back we paid what we assumed would be a quick visit to Cowra POW Camp, and ended up staying longer than we anticipated.
The camp was built during WWII and housed about 4000 prisoners in four compounds. Many were Italians, there were some Koreans who had served in the Japanese military, a group of Indonesian civilians, but there were also just over 1,000 Japanese prisoners.
In August 1944 word was leaked of a plan to move all of the Japanese prisoner who were not officers or NCOs to another camp at nearby Hay. The prisoners were informed on 4th August. On the night of the 5th August, just over 1,000 attempted a massed breakout.
Armed with improvised weapons, they stormed the guard posts en masse. Four Australian soldiers were killed, along with numerous POWs. Just over 350 actually escaped the camp, disappearing into the surrounding countryside. A number committed suicide either during the breakout, or after it. There are stories of prisoners attempting to hitch-hike, and cases of local civilians giving them food and shelter. The prisoners themselves had been ordered not to harm the local civilian population. Within 10 days all of the surviving escapees had been recaptured.
The final toll was 4 Australian soldiers killed, along with 231 prisoners dead and 108 wounded. Many died by suicide or at the hands of their fellows.
The camp itself continued to operate until the end of the war.
Virtually none of the original camp structure survives, but the area it covered has footpaths and numerous interpretative boards which explain life in the camp, and the lead-up to the breakout as well as the events of the breakout itself. These photos show some of the surviving structures and foundations. Sadly I don't have much in the way of notes as to what most of these pictures are of.
This is a reconstruction.
The layout of the camp.
The Italian prisoners had numerous craftsmen in their ranks. They built two fountains in their compound, parts of which still survive. They also worked in the local community; indeed they seem to have been lightly supervised, with an expectation that they would work outside the camp during the day and return at night. Some even used this freedom of movement to carry on romantic relationships with the locals.
Near the camp is a Japanese war cemetery; initially this held the dead from the breakout, but in 1960 it was expanded to house the remains of all Japanese war dead in Australia. In addition Cowra has a magnificent Japanese garden, built in part by the Japanese government in gratitude for the town's respectful treatment of both the prisoners and the war-dead. It exists as a symbol of peace and friendship between the people of Japan and the people of Cowra.
Thursday 30 November 2017
Friday 24 November 2017
HOTT Epic 40K - Tyranids vs Chaos
You don't often see Tyranids fighting Chaos, so this is a rare treat.
We played a 96AP game of HOTT last night, using my Epic 40K armies. Each army had four commanders, and troops were split up between them. On one side were (obviously) Tyranids, under Gary and Caesar, whilst Geoff and I used a Chaos army with a few Dark Eldar allies (because I don't quite have 96AP of Chaos troops yet).
Here's the setup. The table was 6' wide, but maintained the usual 2' depth for a 1" to 100p groundscale.
Some Chaos. So chaotic that Khorne and Slaanesh were fighting side by side.
The Chaos centre. The Demon Engine is the CinC.
The Chaos right flank was the first to see action, with it's war-engines and tanks piling into swarms of small Tyranid warriors.
More action in the centre saw Chaos Marines fighting various large Tyranid horrors.
On the right flank things started going badly for the forces of Chaos, as horrors swept out of the ruins destroying everything in their path.
However it wasn't enough - one Chaos Land-Raider kept pushing back its opponent which, in turn, kept pushing back the Tryanid's Dominatrix (the army's magician CinC). It was pushed back so far that it was shoved off the table and lost. This broke the Tyranid army, giving Chaos a rather fluky win.
With time in hand we carried on the battle. The Chaos right flank troops now tries to reorganise and roll up the Tyranid army.
On the other flank things had developed slowly, due to PIP starvation and the fact that neither side felt there was much advantage in pushing the attack.
The Chaos CinC was isolated by a swarm of Tyranid hordes ...
... and destroyed.
Gary finally attacked the Dark Eldar allies holding the left flank, with the Tyranid monsters more than equal to the task of defeating the lighter Eldar attack-craft.
The Eldar broke, and this actually broke the whole Chaos army in terms of losses. But it was, of course, only a hypothetical win.
The Tyranids very much had the better of this game, and lost it to some unfortunate positioning and unlucky rolls. But it was a fun game with tons of figures on the table and plenty of action.
Sunday 19 November 2017
Galleries and Galliots
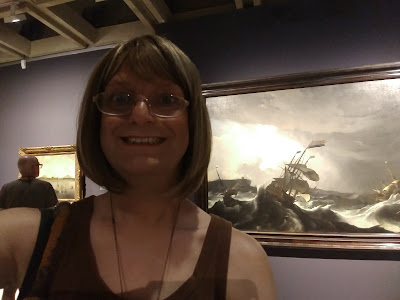
Today Catherine and I went up to Sydney in order to see and exhibition at the Art Gallery of New South Wales. Entitle 'Rembrandt and the Dutch Golden Age : Masterpieces from the Rijksmuseum', it's a collection of paintings from the main museum on Amsterdam, and illustrates the style of art influenced by the unique Dutch society of the 17th century. The centrepiece is a room devoted to Rembrandt, but this post is about the second room we encountered. This was the view as I came into it.
It covered the influence of Dutch overseas trade, specifically the Dutch East India Company, and it's naval power.
Needless to say I was like a kid in a sweetshop. Behind me is a picture of a Dutch warship in a storm; possibly a wreck off Gibraltar, although that is unclear.
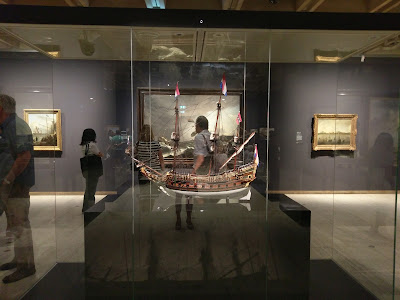
There were about ten paintings in all, plus this - a model of a 1640s 44-gun warship, probably made for a guild or merchant company.
It's exquisite.
Did warships of the period really have all this carving and decoration? Repairs would have been fifty-percent art restoration.
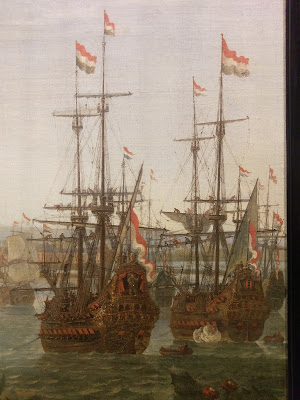
Anyway, I know that some readers of this blog like ships, so I took a few pictures of bits of the paintings for both them and my own personal collection. This first set are from a couple of paintings of Dutch ships off Batavia. In the background you can see the port and castle of Batavia itself.
On the other side of the gallery was this; a painting of the Four Days Battle of 1666 by Willem van de Velde. Pure naval battle painting porn. Just look at the glorious detail!
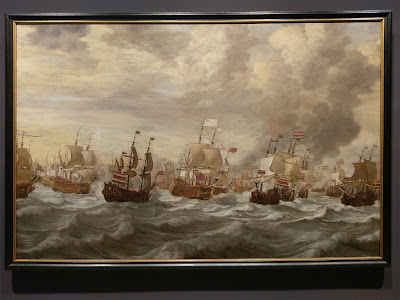
A couple of ladies were looking at the picture and trying to puzzle out the flags. I couldn't help myself, and they ended up learning more about naval ensigns that I suspect they needed to know.
Anyway, if you want to see more, the exhibition runs until February 18th next year. The rest of it is almost as good as the pictures of ships, so it's well worth the trip.
(The title mentioned 'Galliots' I have no idea if there are any in the pictures.)
Saturday 18 November 2017
The Action at Morton Fendlow
I finally found the time, opportunity and inclination to play another game in my ongoing ECW mini-campaign set in the fictional county of Midsomer. Regular readers of the blog will know that this involves Parliamentarians under Sir Thomas Barnaby vying for control of the country with the Royalists under Lord Standing. The background, setup and basic campaign rules can be found HERE. The first two battles are here:
Midsomer Barrow - In which the two sides met for the first time, and Causton declared for the winner.
Ford Florey - In which both sides battled for control of some strategic river crossings.
Prince Rupert's supply trains had now reached Lord Standing, despite his failure to secure the two crossings over the Waterman. Sir Thomas Barnaby dispatched forces to try and seize some of the supplies. One such raiding force, under Sir Henry Nelson, found its return to the town of Causton blocked by a small group of Royalists:
The scenario generated was Escape. Once again I randomly determined the forces, and both sides came out about even.
The Royalists got:
1 x Pike & Shot (Pike-Heavy, Elite)
1 x Pike & Shot (Raw)
1 x Pike & Shot (Shot-Heavy, Raw)
1 x Artillery (Raw)
1 x Horse (Dashing, Elite)
1 x Horse (Dashing, Elite)
Sir Henry Nelson's Parliamentarian troops consisted of:
1 x Pike & Shot (Shot-Heavy)
1 x Pike & Shot (Shot-Heavy)
1 x Pike & Shot
1 x Pike & Shot
1 x Horse (Disciplined, Raw)
1 x Dragoons (Raw)
The Parliamentarian troops had to advance down the road and exit at least half of their units off the other side of the board. The Royalists had to stop them, with their forces appearing from three of the board edges over the course of the game.
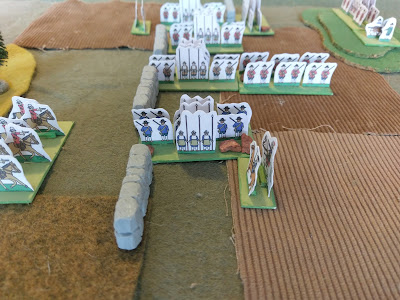
Parliament's dragoons and horse led the move down the road, whilst a unit of unpromising Royalist infantry blocked the way. The fact that they seemed confident, despite the disparity in numbers, alerted Sir Henry to the possibility that they had reinforcements on the way.
And they quickly appeared; more infantry, with a gun in support, appeared on a hill to the left of the Parliamentarians.
Sir Henry quickly deployed as many troops as possible to open up the road, but the defending Royalists stood firm, rallied by their commander.
Unable to dislodge them with musketry, Sir Henry ordered his horse into the attack, hoping to keep them tied down whilst his other troops slipped past.
The pressure was on; Royalist cavalry appeared on the other Parliamentary flank.
Parliament foot engaged the Royalists on the hill; one of their units broke under fire, however.
Sir Henry's troops moved closer to the end of the road and their escape.
But the Royalists were closing in. Their horse charged one of the rearguard pike and shot units.
The dragoons escaped.
Strangely (a quirk of the scenario) almost immediately afterwards the final reinforcing Royalist unit appeared along the same stretch of road.
The Royalist cavalry had the parliamentarian rearguard under extreme pressure by this stage.
In fact Parliament was under pressure everywhere; their horse was still locked in a fight with the original Royalist foot unit, whilst their foot was now blocked in their escape by the fresh unit of Royalist reinforcements; veteran Cornish foot at that.
The Royalist cavalry prevailed, and their pursuit took out the Parliamentarian horse as well.
Both remaining Parliamentarian units had to escape for Sir Henry to salvage any honour. They launched a furious assault on the Cornishmen as the other Royalists closed in from their rear.
The Cornishmen held, and Sir Henry's infantry now found themselves attacked from all directions.
They put up an epic defence, breaking the Cornish foot ...
... before turning on their pursuers and almost breaking them as well.
But the Royalist horse launched a final charge which saw them routed. Sir Henry was defeated.
In campaign terms this ends the skirmish phase. With the Royalist win, and their position secured, the campaign moves into the next stage; their advance on the town of Causton itself.
This was a fairly even fight, all things considered, but the Royalists were able to use their initial unit of foot to hold up their opponents just long enough for the reinforcements to do their work. This was due to their leader performing a series of excellent rallying rolls, staving off their rout more than once. It does show how using different rules for the scenarios in One Hour Wargames can affect the balance. This particular scenario is pretty much predicated on the fact that the rules in the book have attritional loss with no recovery. It's really down to how quickly you can remove the initial defending unit. If the unit can recover hits, then obviously it will take longer, and the reinforcements will be able to pin the fleeing force more easily. I've had some reservations about leader rallying hits under these rules before, and experimented with different approaches. I need to give it some more consideration.
This game completes yet another category in my Six by Six Challenge. Any continuation of this campaign can now be done at my leisure. I now have just one game left to play. However that's a game of HOTT and it means I have to produce a new army by the end of the year as well.
6x6 - Game 2.6
Subscribe to:
Posts (Atom)


